Making a Website Using Ionic & Firebase Hosting

So I recently accomplished making a website using Ionic3 (https://pjaguar.com/) for my company. I’d like to give a big shoutout to all the Ionic developers for this amazing framework. Anyway, here’s how I did it:

1: Make an Ionic 3 project directory. You can find out how almost anywhere.

2: Run ionic serve (Using Ionic-lab would be futile)

3: Make a separate directory using the firebase-cli command: firebase serve

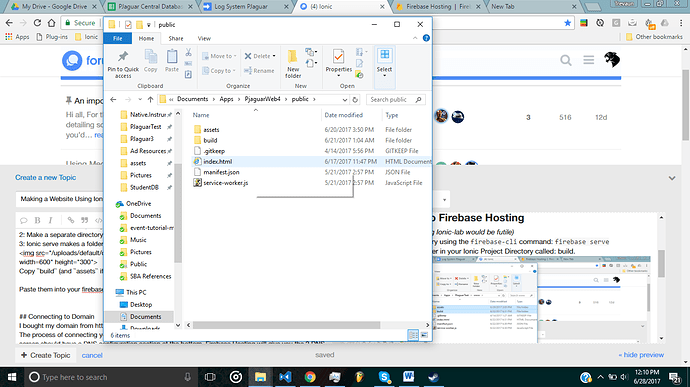
4: Ionic serve makes a folder in your Ionic Project Directory’s /www called: build.
Copy build (and assets if needed).
<img src="//cdck-file-uploads-global.s3.dualstack.us-west-2.amazonaws.com/ionicframework/original/3X/7/a/7a3d19302b2d1b5d53d9407a5a6cdc76fcf29240.png" width=600" height=“300”>

5: Paste them into your firebase directory public folder.

You may also want to copy over your index.html for SEO and website meta data.

5: Run firebase deploy in your Firebase project directory and you should be able to see your progress in your hosting site URL.

Making URLS

2: Now, in Ionic 3 lazy loading, it actually makes a URL for every page with the @IonicPage decorator. You can modify this URL using the segment in @IonicPage object

@IonicPage({
  segment : "new-assignment"
})
@Component({
  selector: 'page-new-assignment',
  templateUrl: 'new-assignment.html',
})
export class NewAssignment {
  constructor(
    public navCtrl: NavController, 
    public navParams: NavParams) {}

3: For pages that are details for items or whatnot…

@IonicPage({
  // defaultHistory: ["HomePage"],
  segment: 'assignments/:sbaid/drive&=sdk/:timestamp',
})
@Component({
  selector: 'assignment-content',
  templateUrl: 'assignment-content.html',
})
export class AssignmentContent {
  constructor(
    public navCtrl: NavController, 
    public navParams: NavParams) {}

Connecting to Domain

I bought my domain from https://domains.google.com . Google all the way.
The process of connecting your Firebase Hosting Site to your domain is quite easy. The domain info screen should have a DNS configuration section at the bottom. Firebase Hosting will give you the 2 DNS config numbers in which you input into your Site Config.

Detailed explanation: https://stackoverflow.com/a/43301248

Extra Resources I used

1:

Code to find out if an ID/Item exists in Firebase database:
Taken from: https://gist.github.com/anantn/4323949

My modifications in my project:


@IonicPage({
  // defaultHistory: ["HomePage"],
  segment: 'assignments/:sbaid/drive&=sdk/:timestamp',
})
@Component({
  selector: 'assignment-content',
  templateUrl: 'assignment-content.html',
})
export class AssignmentContent {
  constructor(
    public navCtrl: NavController, 
    public navParams: NavParams) {
         this.validateID()

}

  validateID(){
    
  this.eventsdata.getrequestDetail( this.navParams.get('sbaid')).once('value', ((snapshot)=> {
     var exists = (snapshot.val() !== null);
     this.AssignmentExistsCallback(   this.navParams.get('sbaid') , exists);
  })
  )
  
}

AssignmentExistsCallback(sbaId, exists) {
  if (exists) {
    this.show = true
    this.Sbaiid = sbaId
    this.LoadAnswers()

    setTimeout(()=>{
this.LoadAnswers()

    },3000)
  } else {
  this.veryCustomShowAlert("Whoops 🛫","Sorry, the assignment you requested does not exist", "Ok","Cancel")

  }
}

this.eventData.getRequestDetail()

getrequestDetail(aid): any {
    return this.sbaList.child(aid);
  }

Example: This URL contains an ID that does not exist in my Firebase database. Observe how the code handles it:

https://pjaguar.com/#/assignments/paIdye0DFZ/drive&=sdk/1234525345.54

2:

Code to center items on page and applies padding where needed to improve website UX
(Taken from the Ionic 3 conference app)

app.scss

  .innercontent-padding ion-card-header .item {
    padding: 4px 30px;
  }

  .innercontent-padding ion-card-header,
  .innercontent-padding ion-card-content,
  .innercontent-padding ion-card-content .list ion-item-content, {
    padding: 0;
  }

  @media (min-width: 600px) {
    .innercontent-padding {
      width: 60%;
      margin: 23px auto;
    }
  }

Usage anypage.html


     <ion-header >
    
</ion-header>
<ion-content  class="outer-content speaker-list">

<ion-card class="innercontent-padding"  text-wrap>

   </ion-card>

</ion-content>

(Taken from Ionic 3 Conference app: list of speakers page)

  • Hints and Important Notes

My firebase database version is 3.7.5

Modals do not load when a @IonicPage decorator is attached so use the “app.module.ts” to initialize them.

Thank you! I hope to see more websites made with Ionic soon! If there are any suggestions or questions, proceed to the comments below.
6 Likes

Looks awesome! That’s the power of Ionic :slight_smile:

One question, how did you code the special footer area with all the links? Is it inside an ion-footer or some special component you created? Thanks!

2 Likes

@saimon Looks like a custom component, called global-footer. It’s inside ion-content with the rest of the stuff.

1 Like

Thanks for sharing. One comment: Instead of ionic serve I suggest you use npm run build --prod to build your www folder. This runs a production build and makes the files in www/build much smaller.

4 Likes

Never thought of this, Thank you.

Yeah as @ihadeed said, I used a component called global footer.

Here’s the code (Remember to change it):

global-footer.html:

<!-- Generated template for the GlobalFooter component -->
 <div style="padding: 80px"></div>
<div padding class="outer-content speaker-list darkback">

  <div class="speaker-card">

    <ion-grid>

      <ion-row>

        <ion-col>
          <ion-list>
            <h4>
More
            </h4>
              <h6  (click)="openPage('NewAssignment')"> New Assignment </h6>
              <h6 (click)="openPage('AssignmentEnter')"> Existing Assignment </h6>
              <h6 (click)="open('https://play.google.com/store/apps/details?id=com.anniecorpinc.projectjaguar')"> Download on Device </h6>
              <h6 (click)="openPage('Services')"> Services </h6>
              <h6 (click)="open('https://pjaguar.com/#/faq')"> Jobs </h6>


          </ion-list>

        </ion-col>

        <ion-col>

          <ion-list>
    <h4>
                  Social
                </h4>
              <h6 (click)="openPage('PublicCommunity')"> Join Public Community </h6>
              <h6 (click)="openPage('TeacherCommunity')"> Join Teachers Community </h6>
              <h6 (click)="open('https://www.facebook.com/ProjectJaguarINC/')"> Facebook </h6>
              <h6 (click)="open('https://www.instagram.com/pjaguarinc/')"> Instagram </h6>
              <h6 (click)="open('mailto:info@pjaguar.com')"> Email </h6>
              

          </ion-list>
        </ion-col>

        <ion-col>

          <ion-list>
<h4>
              Documentation
            </h4>
              <h6 (click)="open('https://drive.google.com/open?id=0B31gI4ogLmC8Si0wYTlYbWx0Vnc')"> Company Policy </h6>
              <h6 (click)="open('https://drive.google.com/open?id=0B31gI4ogLmC8RnBtYnRNVzFFZjg')"> Privacy Policy </h6>
              <h6 (click)="open('https://pjaguar.com/#/subjectresource')"> Supported Subjects & Resources </h6>
              <h6 (click)="openPage('About')"> About </h6>
              <h6 (click)="openPage('Faq')"> FAQ </h6>
              <h6 (click)="openPage('Members')"> PJaguar Team Members </h6>

          </ion-list>
        </ion-col>

      </ion-row>
    </ion-grid>
<p text-center padding>
Copyright © 2017 Project Jaguar Inc. || All Rights Reserved
</p> 

  </div>
</div>

global-footer.ts

import { Component } from '@angular/core';
import {
  NavController, Events, NavParams, ModalController, ViewController, Content,
  ActionSheetController, AlertController, ToastController,MenuController
} from 'ionic-angular';
/**
 * Generated class for the GlobalFooter component.
 *
 * See https://angular.io/docs/ts/latest/api/core/index/ComponentMetadata-class.html
 * for more info on Angular Components.
 */
@Component({
  selector: 'global-footer',
  templateUrl: 'global-footer.html'
})
export class GlobalFooter {

  text: string;

  constructor(
   public nav: NavController
  ) {

    console.log('Hello GlobalFooter Component');
    this.text = 'Hello World';
  }


  open(link){
    window.open(link,"_self");
  }

  openPage(page:string){
    this.nav.setRoot(page);
  }

   goTutoring(){
  }


}

And to Import it into a page, I import it into the page module (IonicPage decorator needed)

import { NgModule } from '@angular/core';
import { IonicPageModule } from 'ionic-angular';
import { Page } from './page';
import { GlobalFooterModule } from '../../components/global-header/global-header.module';

@NgModule({
  declarations: [
    Page,
  ],
  imports: [
    GlobalFooterModule,
    IonicPageModule.forChild(Page),
  ],
  exports: [
    Page
  ]
})
export class PageModule {}

and finally, showing it in the Page.html

<ion-content>
<global-footer> </global-footer>
</ion-content>

Does anyone know why the “/#” shows after the root URL?

I am trying to figure out this one. However, it is related to Angular 4 and not directly to Ionic 3.

If you are wondering about SEO in your Ionic website, you can use the following:

import { Meta, Title } from "@angular/platform-browser";

constructor(meta: Meta, title: Title) {

    title.setTitle('Title of the page');

    meta.addTags ( [
      { name: 'author',   content: 'Author's name'},
      { name: 'keywords', content: 'keyword 1, keyword 2......'},
      { name: 'description', content: 'Description of the page' }
    ] );

  }
3 Likes

How could I upload images with this website ?! @trevaun23 @saimon

I have a problem. The command "ionic cordova build android didn’t worked correctly. What can i do…

@trevaun23 @saimon @ihadeed
I’m building a website with ionic . I push data with navCtrl to another page and every thing is working as expected . I get the params form constructor . the problem is when I refresh this page with browser not from ionic app , I get error ‘undefined id for my collection in database’ that’s a result of no params any more . how could I solve this problem ? thanks in advance :slight_smile:

Hey! Apologies for my late reply but I hope this code answers your question:

Since I cant use the Ionic Plugins for uploading images, I use this:

In CMD:
npm install ng2-file-input

in page.module.ts
import { Ng2FileInputModule } from 'ng2-file-input';
in page.html

 <ion-item  >
      <ng2-file-input   [browse-text]="'Drop your files here'" [drop-text]="'📁 <br><br>'" [remove-text]="'Off you go'" [id]="'multiFilesInputWithPreview'" (onCouldNotRemove)="onCouldNotRemove($event)" [multiple]="true"  (onRemoved)="onRemoved($event)" (onAdded)="onAdded($event)" (onAction)="onAction($event)"></ng2-file-input>
 
 
 </ion-item>

in page.ts (Imports)
import { Ng2FileInputService, Ng2FileInputAction } from 'ng2-file-input';

in page.ts (Variable Declaration)

myFileInputIdentifier:string = "multiFilesInputWithPreview";
  public actionLog:string="";

in page.ts (Constructor)


  constructor(
    public ng2FileInputService: Ng2FileInputService,

in page.ts (Main)

public onAction(event: any){
    //console.log(event);
    this.actionLog += "\n currentFiles: " + this.getFileNames(event.currentFiles);
   // console.log(this.actionLog);

   
  }
  public onAdded(event: any){
    this.actionLog += "\n FileInput: "+event;
    this.actionLog += "\n Action: File added";
   //   let filename = this.eventData.getfilename(fileentry);
   //     let fileext = this.eventData.getfileext(fileentry);
   
      
    }
  public onRemoved(event: any){
    this.actionLog += "\n FileInput: "+event.id;
    this.actionLog += "\n Action: File removed";
  }
  public onInvalidDenied(event: any){
    this.actionLog += "\n FileInput: "+event.id;
    this.actionLog += "\n Action: File denied";
  }
  public onCouldNotRemove(event: any){
    this.actionLog += "\n FileInput: "+event.id;
    this.actionLog += "\n Action: Could not remove file";
  }
  resetFileInput() {
    this.ng2FileInputService.reset(this.myFileInputIdentifier);
  }
  logCurrentFiles(){
    let files=this.ng2FileInputService.getCurrentFiles(this.myFileInputIdentifier);
    this.actionLog += "\n The currently added files are: " + this.getFileNames(files);
       console.log(this.actionLog);
  }
  getFileNames(files:File[]){
    let names=files.forEach((file) => {
        var reader = new FileReader();
       let filedata =  reader.readAsDataURL(file)
    console.log(filedata);
        console.log(file.name);

        var reader = new FileReader();
        reader.onload = (function(theFile){
          var fileName = file.name;
          return function(e){
            console.log(fileName);
            console.log(e.target.result);
          };
        })(file);
        reader.readAsArrayBuffer(file);
       
    });
      
      
    //return names ? names.join(", "): "No files currently added.";


  }

To get the Files:
this.ng2FileInputService.getCurrentFiles(this.myFileInputIdentifier)

You can see this in action here: https://pjaguar.com/#/new-assignment

I used to have this problem because of the lifecycle hooks.

Instead of using ngOnInit() or the constructor to process the params, I use:

ngAfterViewInit(){
//code with id
}

Instead of using ionViewWillEnter(), I use:

ionViewDidEnter(){
//code with id
}

@trevaun23 thanks for your answer . I have watched vedio on youtube use input type file for implementing the uploading . what do you think of this way ?

I tried that too. Longer process. (I’m a lazy programmer, I go for the easiest and asthetically pleasing solution)

1 Like

In ng2-file-input docs they say that i should install bootstrap . so how did you install it ?

I didn’t put in bootstrap until a few weeks after adding in the file input. But you can use the CDN to get bootstrap.

1 Like

A vote of thanks :slight_smile:

no errors appears if the file is not in my extensions … what I should do ?

@Morad-Abdo did you get this to work with the method that @trevaun23 proposed i.e using ngAfterViewInit() and ionViewWillEnter() ? I’m looking into this area at the moment and keen to know the best way to go. Thanks!